Introduction
LEDs (Light Emitting Diodes) are efficient but delicate components that require a resistor to limit the current. This tutorial explains how to calculate and connect the correct resistor to protect your LED and demonstrates the practical application of Ohm's Law in circuit design. By the end of this tutorial, you'll have a solid understanding of current-limiting resistors and their importance in circuit design.
Circuit Diagram

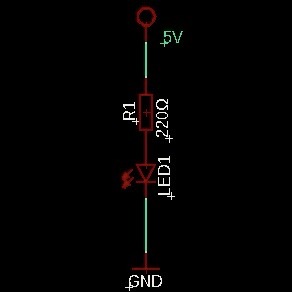
Here’s a simple schematic for connecting an LED with a current-limiting resistor:
- Vin: Input voltage (e.g., 5V USB)
- R: Current-limiting resistor
- LED: Light Emitting Diode
Resistor Calculation
Use Ohm's Law to determine the required resistor value:
R = (Vin - VLED) / IFor a 5V supply, 2V LED forward voltage, and desired currents:
- 20mA: R = (5V - 2V) / 0.02A = 150Ω
- 15mA: R = (5V - 2V) / 0.015A ≈ 200Ω
Tip: Use a 220Ω resistor for a safe, long-lasting setup, as it limits current to about 13.6mA.
Required Components
Assembly Steps
Step 1: Place the LED
Insert the LED into the breadboard. Ensure the anode (long leg) and cathode (short leg) are in separate rows.
Step 2: Connect the Resistor
Connect one end of the resistor to the cathode of the LED and the other end to the breadboard’s GND row.
Step 3: Wire the Power Supply
Connect the LED’s anode to 5V and the resistor’s free end to GND.
Step 4: Test the Circuit
Power the circuit and observe the LED brightness. Adjust resistor values if needed for different currents.
Experiment
Test various resistor values (e.g., 150Ω, 220Ω, 330Ω) to compare LED brightness and current consumption. Record and analyze the results.
Here's how the current impacts brightness:
- Lower resistance = Higher current = Brighter LED (but shorter lifespan).
- Higher resistance = Lower current = Dimmer LED (but longer lifespan).
Experiment with these configurations to find the optimal balance for your project.
Advanced Techniques
For more precise control, consider using a variable resistor (potentiometer) to adjust the current dynamically. This setup is useful for applications requiring adjustable brightness.
Applications
- Indicator lights
- Control panels
- Decorative lighting
- Development board indicators
- Basic DIY electronic projects
- Interactive art installations
Common Mistakes
- Forgetting to use a resistor, which can damage the LED permanently.
- Using a resistor with an incorrect value, resulting in either no light or a burned-out LED.
- Reversing the LED polarity (anode and cathode connections).
- Supplying excessive voltage to the circuit without proper calculations.
Always double-check your circuit connections and calculations to avoid these issues.
Conclusion
By understanding and applying resistor calculations, you can protect LEDs in various circuits, enhancing safety and longevity. Experiment with different setups to explore further possibilities. Whether you're a beginner or an experienced maker, mastering LED circuits is an essential skill in electronics.
